Updated: October 14, 2026
Updated and fact-checked: October 13, 2026
Charcoal grill for indirect heat means arranging the lit coals so food cooks beside the fire instead of directly above it. With the lid closed, the empty side becomes a practical roasting chamber that finishes thick cuts evenly while the coal side handles searing, browning, or flare-up control.
Quick Answer: How Do I Set Up a Charcoal Grill for Indirect Heat?
Light a chimney of charcoal until the top coals are ashed over, bank the entire load on one half of the charcoal grate, and leave the other half empty. Set the cooking grate, close the lid with the top vent over the empty side, and preheat about 10 minutes. Sear or brown over the coals, then move food to the empty side to finish.
Key Points
- Indirect heat is fire next to the food, not under it. The closed lid turns the empty side into a small oven.
- The everyday method is a banked pile of already-lit coals covering roughly half the charcoal grate.
- Weber’s classic method uses two equal piles on opposite sides with food in the center for more even heat on large roasts.
- Bottom vent feeds oxygen and is the main temperature control. Top vent stays mostly open for clean airflow.
- A full standard chimney holds roughly 80–100 briquettes and typically gives 1 to 1.5 hours of usable heat before more fuel is needed.
- Use a grate-level thermometer on the cool side. The lid gauge often reads higher air, not the temperature next to the food.
- A drip pan under the cool side catches fat and can hold a little water on longer cooks.
Why Does Indirect Heat Matter on a Charcoal Grill?
A full bed of coals under the entire grate gives you only one temperature: hot. That works for thin burgers, hot dogs, and quick vegetables. It fails on chicken pieces, thick steaks, bone-in chops, and anything with fat that can drip and flare, because the outside burns before the center reaches a safe temperature. Banking the coals creates an escape zone and a finishing zone. The USDA notes that meat and poultry brown quickly on a grill, so color is not a safety test; a food thermometer is required. The indirect side gives you a place to finish without constant direct flame.
What Equipment Do You Need?
A chimney starter, heat-resistant gloves, and a level charcoal grate are the essentials. Long tongs or a charcoal rake help shape the pile. A disposable aluminum pan works as a drip pan. An instant-read thermometer checks the food. A second probe or inexpensive oven thermometer placed at grate level on the cool side is more accurate than the lid dial for air temperature. Charcoal baskets or a Slow ’n Sear-style trough keep the hot pile from sliding into the cool zone, but they are optional. The method works with ordinary charcoal and a standard kettle or rectangular charcoal grill.
How Much Charcoal Should You Use?
Start with a three-quarter to full chimney for most 22-inch kettle cooks. A standard chimney holds roughly 80 to 100 briquettes (about 4 to 5 pounds). Weber notes a full chimney typically provides 1 to 1.5 hours of cook time before more fuel is needed. A three-quarter chimney is often enough for weeknight chicken or steaks and gives a longer, milder burn. A full chimney raises the hot-side temperature and shortens the overall burn. Half a chimney works for gentler roasting or smaller grills. Lump charcoal is less dense, so the same volume weighs less and often burns hotter and faster than briquettes. Briquettes give a more predictable, even bed, which is why they are the usual choice for controlled indirect setups. Weather matters: cold air, wind, or damp charcoal can slow lighting and require a bit more fuel or time.
How Do You Build the Basic Banked Two-Zone Fire?
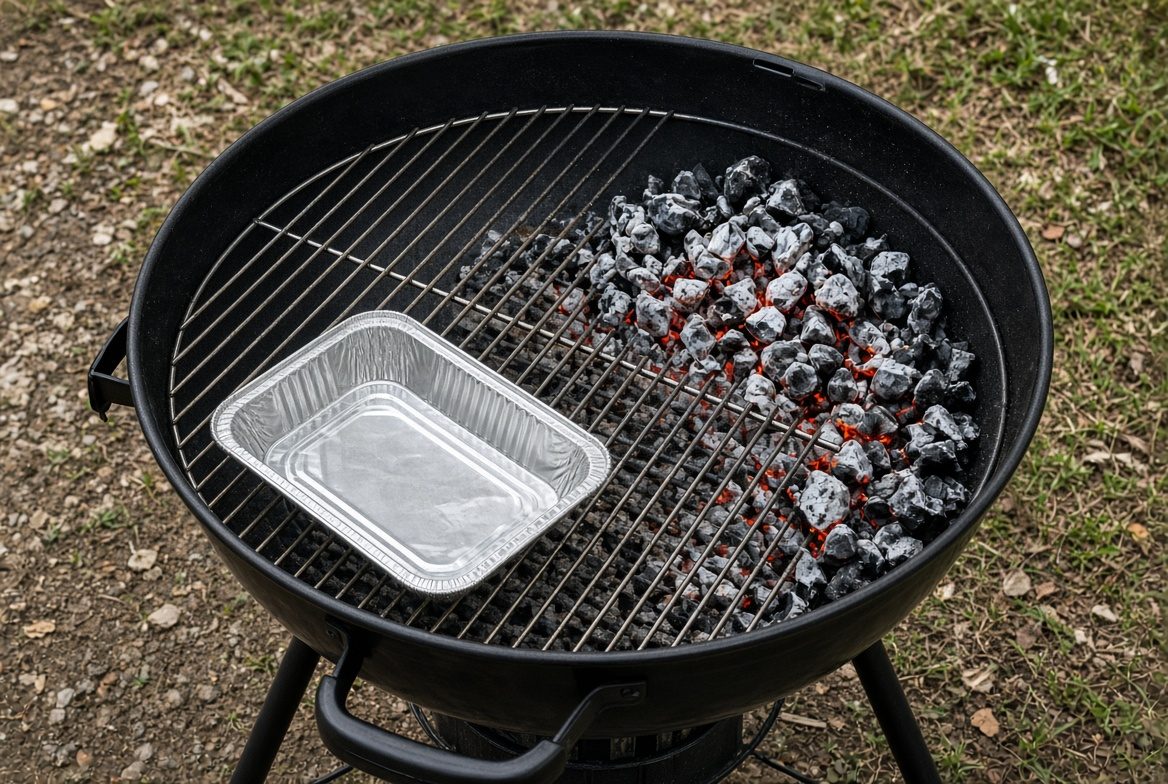
Dump all the lit coals on one side and leave a clear empty zone on the other. This is the setup most backyard cooks should learn first because it gives a large cool zone for finishing and flare-up control.
- Open the bottom vent fully. Clean ash from the bowl so air can reach the fire.
- Fill a chimney starter three-quarters to full with charcoal. Place newspaper or a solid fire starter underneath and light it. Wait until the top coals are covered with gray ash and the lower coals are glowing, usually 15 to 20 minutes. Do not use lighter fluid.
- Wear heat-resistant gloves. Pour the coals onto one half to two-thirds of the charcoal grate. Pack them in a tight layer against the wall of the kettle. Leave the other half completely empty so there is a clear gap.
- Set a drip pan on the empty side if the cook will last more than about 30 minutes. Add a little hot water if you want extra humidity and to help stabilize temperature.
- Replace the cooking grate. Open the top vent. Close the lid so the top vent sits over the empty side. This pulls heat and smoke across the food before it exits.
- Preheat 10 minutes with the lid closed. Clean and lightly oil the grate. Place a thermometer at grate level on the cool side if you have one.
The hand test is only approximate: over the coals you can usually hold your hand a few inches above the grate for only a couple of seconds; over the empty side you can hold it longer. Rely on a thermometer for actual temperatures.
When Should You Use Opposite-Side Piles Instead?
Use two equal piles on opposite sides when you want the most even heat around a large roast or whole chicken. Weber’s charcoal guidance describes spreading the ashed coals into two piles so the food sits in the center between them. This supplies indirect heat from both sides and is useful for items that benefit from rotation or longer roasting. The cool zone in the middle is smaller than a single-side bank, so you have less room to park food during a flare-up. Place a drip pan in the center. Position the lid so any built-in thermometer is not sitting directly over the coals. This arrangement is a solid alternative for whole birds or large cuts, but the one-side bank remains the more practical default for most meals.
How Do You Control Temperature Once the Fire Is Set?
Start with both vents open, then use the bottom vent as the main temperature dial. More air equals a hotter fire. After the coals are established, leave the top vent mostly open so smoke and gases can escape cleanly. Adjust the bottom vent in small increments and wait several minutes for the change to register. Closing both vents smothers the fire and can push thick, dirty smoke onto the food. Established practice from sources such as AmazingRibs recommends controlling heat primarily with the intake (bottom) vent while keeping the exhaust open for clean combustion. For a longer cook, add a handful of unlit briquettes to the edge of the hot pile every 30 to 45 minutes so they catch gradually without a big temperature swing. Wind, cold weather, a full ash bowl, or wet charcoal will swing temperatures more than the brand of fuel. A grate-level thermometer on the cool side is the reading that matters.
| Setup | Coal Arrangement | Typical Use | Cool-Side Character (lid closed) |
|---|---|---|---|
| Banked one-side | All lit coals on one half | Steaks, chicken pieces, chops, flare-up escape | Larger cool zone; good for sear-then-finish |
| Opposite piles | Two equal piles, food in center | Whole chicken, roasts, even roasting | Smaller center zone; heat from both sides |
| Snake or Minion | Mostly unlit fuel, small lit starter | Hours-long low-and-slow | Slow crawl; not for quick two-zone grilling |
What Should You Cook on the Indirect Side?
Finish thick cuts and roast larger items on the empty side with the lid closed. Sear first when you want a crust, then slide the food off the coals. Start chicken pieces or a whole bird on the cool side if the skin would burn before the meat is done, then finish over the hot side for color if needed. The USDA requires whole poultry and poultry pieces to reach 165°F in the thickest part. Steaks, chops, and roasts of beef, pork, or lamb should reach 145°F and rest at least 3 minutes. Ground meat needs 160°F. Color or grill marks are not a safety test; use a thermometer. Keep perishable food out of the danger zone and refrigerate leftovers within 2 hours (1 hour if the air is above 90°F). A small wood chunk on the edge of the coal pile can add light smoke once the fire is burning clean; soaked chips are more likely to produce steam and dirty smoke.
How Do You Add Fuel or Manage a Longer Cook?
Add unlit briquettes to the edge of the hot pile so they catch gradually. Lighting a second chimney and dumping it on top creates a big temperature spike. For cooks over about an hour, keep a small reserve of charcoal ready. Clear ash if it builds up and blocks the bottom vent. Rotate food if one side is closer to the coals. The snake or Minion methods are different techniques that light only a small starter charge so the fire crawls through unlit fuel for several hours; those are better for true low-and-slow barbecue than for ordinary indirect grilling.
What Mistakes Ruin an Indirect Setup?
Spreading coals edge to edge, leaving the lid open constantly, and ignoring the vents are the usual failures. A thin layer across the whole grate is one-zone grilling with no escape. A sloppy bank that creeps under the food eliminates the cool zone—rake a clear gap or use baskets. Trusting only the lid thermometer means you do not know the actual temperature next to the food. Closing both vents to “save” the fire smothers the coals and can produce thick white smoke. For a grease fire, move the food to the cool side and keep the lid closed on a kettle to starve the flame of air. Do not spray water on burning grease. Opening the lid every couple of minutes dumps heat and stops the cool side from acting like an oven.
How Do You Use a Grill Thermometer with This Setup?
Place a probe or oven thermometer at grate level on the empty (indirect) side, not only relying on the lid gauge. The lid thermometer usually reads the hotter air near the top of the kettle, not the temperature next to the food. A grate-level reading tells you the actual cooking environment on the cool side.
- Clip or set an air probe so the tip sits roughly at the height of the cooking grate on the empty side, a few inches away from the food and not touching metal or the drip pan.
- For the food itself, use an instant-read or leave-in probe in the thickest part of the meat, avoiding bone, fat, and gristle. The USDA requires this for confirming safe internal temperatures.
- Give the grill 10–15 minutes after closing the lid for the reading to stabilize before you adjust vents or add food.
- On a reverse sear or longer roast, watch the grate-level air temperature more than the dome dial. Small bottom-vent changes take several minutes to show up.
- Clean the probe tip between uses and recalibrate an analog thermometer if the manufacturer recommends it. A cheap oven thermometer left on the cool side works as a backup check.
Color and timing are unreliable. The combination of a grate-level air reading and a food thermometer is what keeps the indirect side useful and the meat safe.
How Do You Reverse Sear a Thick Steak on This Setup?
Cook the steak first on the cool side until it is close to the target internal temperature, then sear it briefly over the hot coals. This works best on steaks 1.5 inches thick or more. Thinner steaks are usually better with a straight hot sear. The method uses the same banked two-zone fire.
- Salt the steak (and pepper if desired) and pat it dry. A dry surface browns better. You can salt it 45 minutes ahead or longer in the refrigerator.
- Set up the banked fire so the cool side holds roughly 225–275°F at grate level. Start with a moderate chimney rather than a full raging load so the indirect zone stays in that range. Keep the lid closed.
- Place the steak on the empty side. Insert a probe into the thickest part if you have one. Cook with the lid closed until the internal temperature is about 10–15°F below your final target. For medium-rare that often means pulling around 110–120°F, depending on thickness and how hot the sear will be.
- Move the steak off the grill. Open the vents fully and, if needed, add a small amount of already-lit charcoal to the hot pile so it gets screaming hot for the sear. This takes a few minutes.
- Pat the steak dry again if the surface is moist. Sear over the hot coals 45–90 seconds per side, flipping as needed, until you have the crust you want. Do not walk away. The center will continue to rise a few degrees.
- Rest the steak at least 3 minutes (or longer for thicker cuts) before slicing. Use a thermometer to confirm it has reached a safe minimum of 145°F with rest for whole-muscle beef.
Times are estimates only. A 1.5- to 2-inch steak often needs 20–45 minutes on the cool side depending on starting temperature, exact grill temperature, and thickness. Always cook to internal temperature, not the clock. The site’s reverse-sear guide covers more steak-specific details.
How Does Weather Affect the Setup?
Cold air, wind, and damp charcoal all change how fast the fire lights and how much fuel you need. In cold weather (around 50°F or below) plan on a few extra minutes for the chimney and consider a slightly larger load. Wind increases oxygen flow and can make the fire hotter and less stable; shield the grill if possible and watch the vents. Damp or wet charcoal lights slowly and burns unevenly—dry it if you can or use a fresh bag. High humidity and altitude can also slow the draft. In all cases, clear ash, keep the bottom vent clear, and rely on a grate-level thermometer rather than a fixed timer. The visual cue of gray ash on the top coals remains the reliable signal that the chimney is ready.
Final Verdict: Which Indirect Setup Should You Use?
Learn the banked one-side fire first. It is the simplest way to turn a charcoal kettle into a useful two-temperature cooker for the foods most people actually grill. Use opposite-side piles when you need more even heat around a large roast or whole chicken. Save the snake or Minion method for the times you want the grill to hold 225–275°F for several hours. The hardware is ordinary. The arrangement of the coals and steady vent management are what create the control.
FAQs
How long does a chimney of charcoal last for indirect cooking?
A full chimney of briquettes typically provides about 1 to 1.5 hours of usable heat before you need to add more fuel. Actual time depends on vent settings, weather, and how hot you run the fire. Add unlit briquettes to the edge of the pile rather than waiting until the fire dies.
Should the lid be open or closed?
Close the lid for indirect roasting so the empty side acts like an oven. Leave it open only for short searing or when you need a truly cooler holding zone. Opening the lid repeatedly dumps heat and prevents the cool side from doing its job.
Can I add wood for smoke?
Yes, add one or two dry hardwood chunks to the edge of the coal pile after the fire is burning clean. Wait for thin, clean-smelling smoke before the food goes on. Wet chips are more likely to produce steam and dirty smoke. Stop adding wood once the surface has the color you want.
Does this work on a rectangular charcoal grill?
Yes. Bank the coals along one side or one end the same way. The principle does not change with shape. Leave a clear empty area large enough for the food you plan to finish indirectly.
How do I know if the cool side is hot enough?
Use a thermometer at grate level on the empty side, not only the lid gauge. Dome thermometers often read the air near the top of the kettle. For most finishing and roasting, the cool side with the lid closed runs warmer than many people expect, typically in a useful roasting range once the fire is established.
Related Reading
- How to Set Up Two-Zone Grilling on Charcoal or Gas
- How to Light a Charcoal Grill Without Lighter Fluid
- How to Keep a Charcoal Grill at 225°F
- How to Reverse Sear a Steak on a Grill
About Frank W. Roberts
Frank W. Roberts is the author of Everything Grill Reviews. He has grilled since 1970 and brings more than 50 years of backyard cooking and cookoff experience to fire management, fuel behavior, smoke, and practical cooker use. This article is based on manufacturer guidance (including Weber), established charcoal-grilling practice, and USDA food-safety temperatures, not on a single hands-on test of one specific model. Last verified October 13, 2026.