Updated: September 23, 2026
Learning how to fix uneven heat on a gas grill starts with separating normal cooking zones from an actual equipment problem. Every gas grill has some temperature variation, but a sudden cold strip, one weak burner, heavy soot, or a section that will not preheat usually points to blocked burner ports, misplaced heat shields, restricted fuel flow, grease buildup, or a damaged part.
Quick Answer: Map the hot and cold spots, shut off the gas, let the grill cool, then clean and inspect the grates, heat shields, burner ports, grease system, hose, and fuel connection according to the owner’s manual. Reassemble the parts correctly and repeat the same heat test. Stop using the grill if you smell gas, see a leak, find a split burner, or see flames outside the firebox.
What This Guide Covers
- Normal heat zones versus a real fault
- How to map hot and cold spots
- A safe step-by-step repair checklist
- What common symptoms usually mean
- How to cook evenly when variation remains
- Mistakes that can damage the grill
- Frequently asked questions
Is Uneven Heat on a Gas Grill Normal?
A modest difference across the grate is normal; a dramatic or newly developed difference deserves inspection. Burner spacing, lid shape, firebox depth, wind, and the position of heat tents all affect where heat reaches the cooking surface. Some grills intentionally include a hotter sear area. The front edge may also cook more gently than the center because manufacturers keep flame farther from the control panel.
Unevenness becomes a troubleshooting issue when one of these changes appears:
- One burner produces a noticeably smaller flame than the others.
- A section that used to cook normally becomes cold.
- The grill takes much longer than usual to preheat.
- Food repeatedly scorches above one narrow strip.
- Flames are mostly yellow, lift away from the burner, or appear near the control panel.
- Black soot collects on the food, lid, or grates.
- A burner lights only in part or ignition travels slowly from one burner to the next.
Total burner output does not tell you whether heat will be even. The site’s guide to gas grill BTU ratings and heat flux explains why burner layout, firebox design, heat diffusers, and grate construction matter along with fuel input.
Safety First: When Should You Stop Troubleshooting?
Stop immediately if you smell gas, hear gas escaping, see flames outside the intended burner area, or find a cracked hose, damaged regulator, or split burner. Turn off the control knobs and close the cylinder valve only if you can do so without approaching fire or a strong gas cloud. Move people away and contact the manufacturer, a qualified gas-appliance technician, the fire department, or the propane supplier as the situation requires.
The U.S. Consumer Product Safety Commission’s gas-grill safety guidance says to inspect hoses for cracking, brittleness, holes, sharp bends, and leaks. It recommends checking a propane connection with a soapy solution and having the grill repaired if tightening the connection does not stop bubbles. Never search for a leak with a match or lighter.
Work outdoors in a well-ventilated location. Do not test or repair a gas grill in a garage, carport, enclosed porch, or other confined space. Keep the lid open during lighting unless the manual for your exact model instructs otherwise, and never lean over the cookbox while igniting a burner.
How Do You Find Hot and Cold Spots on a Gas Grill?
Use a repeatable grid test after a normal preheat, then record the result before changing anything. A bread test gives an easy visual map. An infrared thermometer can compare grate-surface temperatures quickly, although shiny metal, distance, and viewing angle affect its readings. You are looking for relative differences, not laboratory-grade numbers.
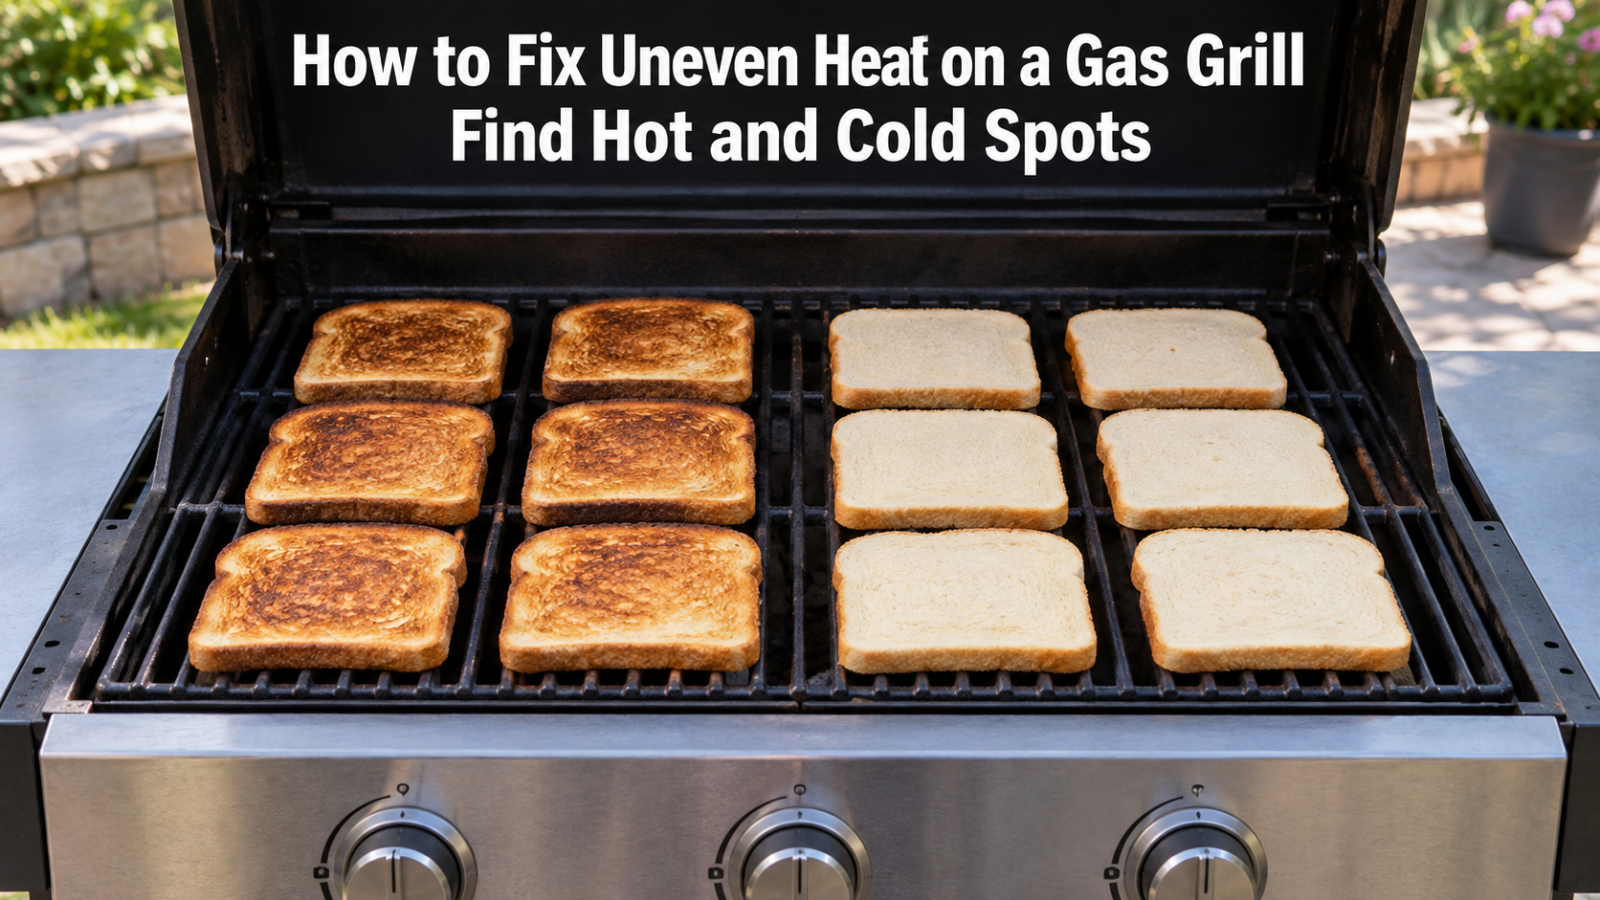
Option 1: The Bread Test
- Start with a clean, safely operating grill. Put every heat shield and cooking grate in its normal position.
- Preheat using the procedure and time in the owner’s manual. Use the same burner setting across the main burners.
- Reduce to a moderate setting so the bread does not ignite immediately.
- Lay slices of plain white sandwich bread across the grate in an orderly grid. Keep the spacing even.
- Stay beside the grill. After about 60 seconds, check the undersides with long tongs. Remove every slice before it burns.
- Arrange the slices on a tray in the same pattern. Dark toast marks hot areas; pale slices mark cooler areas.
Do not treat 60 seconds as a fixed cooking time. A powerful grill may brown the bread sooner. The test is finished as soon as differences are visible. If flames appear, remove the bread, shut the grill down safely, and clean the cookbox after it cools.
Option 2: An Infrared Thermometer
Preheat normally, then scan a consistent set of points from the same distance and angle. Record the center, four corners, and positions over each burner. An infrared thermometer reads the surface it sees; it does not measure the air under the lid. Highly reflective stainless steel can give inconsistent readings, so use the numbers as a comparison map rather than an absolute statement of cooking temperature.
What Does the Pattern Tell You?
- One long cold strip over a burner: suspect blocked ports, a fuel-delivery problem, or burner damage.
- One small hot patch: inspect the heat shield above that spot for incorrect placement, a hole, or heavy grease.
- The whole grill is weak: check fuel supply, correct startup procedure, regulator behavior, weather, and whether all burners are receiving gas.
- The windward side is cold: retest in calm conditions while keeping all required ventilation clear.
- A consistent front-to-back gradient: this may be part of the grill’s normal design, especially if the pattern has always been present.
How to Fix Uneven Heat on a Gas Grill Step by Step
Begin with the least invasive checks, then clean and inspect the heat-distribution parts before replacing anything. Photograph each layer before removal so the burner shields and grates return in the correct direction.
1. Confirm the Grill Is Level and Properly Positioned
Set the grill on a firm, level, noncombustible surface with the clearances required by its manual. A tilted grill can send grease toward one side, disturb the way removable heat shields sit, and make the grease tray drain poorly. Never level a hot or lit grill, and never put a grill where the lid or ventilation openings face a combustible wall.
Wind can push heat across the firebox and can interfere with a flame. Move the cold grill to a safer orientation if the manufacturer permits, but do not build a close windbreak around it. A solid panel, wall, tarp, or improvised enclosure can trap heat, block combustion air, or redirect flame toward the cylinder. The Gas Grill Reviews hub can help you compare burner layouts and heat-management designs when repair is no longer economical.
2. Check the Fuel Supply and Startup Procedure
For propane, confirm that the cylinder contains fuel and is connected exactly as the manual describes. A nearly empty cylinder can make the entire grill weak, but it does not usually explain one sharply defined cold strip by itself. For natural gas, verify that the shutoff valve is fully open and that the grill is the correct factory configuration for that fuel.
Some propane regulators include a safety bypass that can restrict flow after an abnormal startup sequence. Reset instructions vary by brand and model. Do not rely on a generic internet sequence, replace a regulator with an unapproved part, or alter an orifice. Follow the exact owner’s manual or the manufacturer’s support instructions for your model.
3. Shut Down, Cool, and Isolate the Fuel
Turn every burner control off, close the propane cylinder valve, and let the grill cool fully. Disconnect the cylinder only if the manual calls for it and you can do so safely outdoors. For a plumbed natural-gas grill, close the approved shutoff valve before service. If you are unsure how to isolate the supply, stop and call a qualified technician.
4. Remove and Clean the Cooking Grates
Carbon and grease on the grates can create local hot spots, sticking, and misleading test results. Match the cleaning tool to the grate material. Porcelain enamel needs a gentler tool than bare stainless steel, and uncoated cast iron must be dried and lightly oiled after washing. The complete finish-safe grill-grate cleaning guide covers porcelain, cast iron, and stainless steel separately.
Inspect any cleaning brush before use. In March 2026, the CPSC recalled about 10.2 million specific Nexgrill wire-bristle brushes because bristles could detach, stick to food, and cause serious internal injury if swallowed. Check the CPSC Nexgrill brush recall for the affected model numbers, and stop using any brush that is recalled, damaged, or shedding.
5. Inspect the Heat Shields
Heat tents, flame tamers, vaporizer bars, and similar shields spread burner heat and protect the flame from drippings. If one is backward, off its support, missing, warped, or rusted through, the food directly above it may scorch while the area beside it stays cooler.
- Compare the installed layout with the owner’s manual or a manufacturer parts diagram.
- Brush or scrape loose carbon only after the parts are cool.
- Clear heavy grease without bending thin metal.
- Replace a shield that has a hole, severe scaling, or no longer sits securely.
- Reinstall every shield in the specified position and orientation.
Do not wrap the shields or the bottom of the cookbox in foil unless the manufacturer specifically approves it. Foil can block airflow and drainage, trap grease, and create hotter or colder zones than the grill was designed to produce.
6. Clean and Inspect the Burner Tubes
Burner ports need to release gas in the pattern intended by the manufacturer. Grease, corrosion, insects, and debris can disturb that pattern. Weber’s current burner-care guidance says clean burner tubes help provide strong, even heat, but the correct access and cleaning direction depend on the grill.
Follow the owner’s manual for removal and cleaning. In general, keep these rules in mind:
- Work only with the grill off, cool, and isolated from its fuel source.
- Use the brush or tool specified by the manufacturer.
- Brush across burner ports when the manual directs; do not force debris deeper into the tube.
- Never drill, enlarge, or reshape a burner port.
- Do not insert a hard object into the gas orifice behind the burner.
- Confirm the burner is properly seated over its valve orifice during reassembly.
- Replace a burner that is split, perforated by rust, badly warped, or unable to sit correctly.
A burner can look clean from above while debris remains near its air inlet. If the manual permits removal, inspect the full tube and inlet area. If removal involves gas fittings or steps you do not understand, use an authorized service provider.
7. Clean the Cookbox and Grease System
With the grill cool and the burners protected or removed as the manual specifies, clear loose debris from the cookbox, grease channel, tray, and catch pan. A mound of carbon can hold heat beneath one section. Pooled grease can cause flare-ups that look like extreme hot spots.
Use only cleaners approved for the surface and keep spray away from valves, igniters, ports, wires, and gas fittings. Empty the grease tray before it overfills. For preventing flames caused by drippings, read how to prevent grill flare-ups.
8. Reassemble and Check the Flame Pattern
Reinstall every burner, shield, grate, fastener, and clip exactly as shown in the manual. Perform any required leak check before lighting. Then light the grill outdoors using the manufacturer’s sequence.
Observe the flame only in the manner the manual allows. Many properly adjusted gas burners show mostly blue flames with small yellow tips, but flame appearance varies with burner design, fuel, altitude, and conditions. The important warning signs are a major change from normal, flames lifting far from the ports, heavy yellow flame with soot, delayed ignition, or fire emerging where it should not. Shut down if any of those occur.
9. Repeat the Same Heat Test
Use the same preheat time, burner setting, bread layout, or thermometer points you used before cleaning. A comparable retest tells you whether the work helped. If the cold strip follows the same burner after cleaning and correct reassembly, the burner, valve, manifold, regulator, or fuel supply may need professional diagnosis.
Uneven Gas-Grill Heat Troubleshooting Chart
| Symptom | Likely areas to inspect | Reasonable next step | Stop-using warning |
|---|---|---|---|
| One narrow cold strip | Ports on the burner below it; burner seating; local shield position | Cool, isolate fuel, clean and reassemble per manual | Split burner, delayed ignition, or flame near the valve |
| One sharp hot patch | Missing, shifted, warped, or perforated heat shield; grease mound | Clean and correctly seat or replace the shield | Sustained grease fire or flames outside the cookbox |
| All burners are weak | Fuel level, supply valve, regulator bypass, startup sequence, cold or wind | Follow the model-specific fuel and regulator instructions | Gas odor, bubbles during leak check, damaged hose or regulator |
| One burner is weak | Blocked ports, debris in inlet, burner damage, valve problem | Clean only as the manual permits; service if weakness remains | Flames at the burner inlet or control panel |
| Food turns black and sooty | Abnormal combustion, blocked air inlet, wrong fuel or conversion, heavy grease | Shut down and use manufacturer support or a qualified technician | Do not continue cooking through soot |
| Heat shifts on windy days | Wind direction, unsafe placement, flame stability | Retest in safe, calmer conditions with vents unobstructed | Repeated flameout or gas accumulation |
How Can You Cook Evenly When the Grill Still Has Normal Hot Spots?
Use the heat map as a cooking tool instead of expecting every square inch to behave identically. A predictable warm zone is useful once the equipment is safe and working as designed.
- Create two zones. Keep one side hotter for browning and another lower or unlit for finishing thicker foods.
- Rotate by position, not by habit. Move food from the mapped hot area to the cooler area once during cooking instead of constantly opening the lid.
- Leave space between pieces. Crowding blocks airflow and makes the grill’s response harder to read.
- Match food to the zone. Put thin vegetables or delicate fish in the gentler area; use the hotter area for a brief sear.
- Use a food thermometer. Grate color and lid temperature cannot confirm whether meat is safely cooked.
- Keep an indirect escape zone. An unlit section gives you somewhere to move fatty food if flames rise.
A griddle or heavy pan can soften small temperature variations, but it also changes airflow and holds a large amount of heat. Use only accessories the grill can safely support, maintain the required clearances, and do not cover the entire cooking surface unless the manufacturer approves that configuration.
Common Mistakes to Avoid
Do Not Drill Out Burner Ports
Enlarging a port changes gas flow and flame distribution. It can create a dangerous flame pattern and permanently damage the burner. Replace a corroded burner with the correct approved part.
Do Not Cover Vents or the Cookbox With Foil
Ventilation and grease drainage are part of the grill’s design. Blocking them can cause poor combustion, trapped heat, grease accumulation, and unpredictable temperature differences.
Do Not Mix Regulators, Orifices, or Fuel Types
Propane and natural-gas components are not interchangeable unless a manufacturer provides an approved conversion for that exact model. An incorrect regulator or orifice can create too much or too little gas flow.
Do Not Diagnose Gas Parts While the Grill Is Hot
Mapping heat happens with the grill operating, but disassembly and cleaning happen only after shutdown, cooling, and fuel isolation. Never reach under grates to adjust a burner on a lit grill.
Do Not Use the Lid Thermometer as a Heat Map
A lid thermometer reads one location above the grate. It can help track overall chamber behavior, but it cannot show that the left grate is hotter than the right. Use food position tests or surface comparisons for that job.
When Should You Replace a Burner or Call for Service?
Replace a burner when the manufacturer’s inspection criteria show it is no longer structurally sound; call for service when the problem involves valves, the manifold, regulator behavior, persistent leaks, or abnormal combustion. Cleaning is appropriate for ordinary port blockage and surface debris. It is not a repair for perforation, a split seam, severe corrosion, or a tube that will not seat securely.
Use the model and serial number to order the exact approved part. Compare the warranty status and the cost of burners, shields, ignition components, and professional labor with the value and overall condition of the grill. A sound grill with one replaceable burner may be worth repairing. A heavily corroded firebox with multiple fuel-system problems may not be.
Frequently Asked Questions
Why is the back of my gas grill hotter than the front?
Heat naturally follows burner placement, firebox shape, airflow, and exhaust paths. A hotter rear section can be normal if the pattern has always been consistent. If the difference appeared suddenly, inspect burner ports, shields, grease buildup, and wind exposure.
Can clogged burner holes cause uneven heat?
Yes. Blocked ports can interrupt the intended flame pattern and create a cooler strip above part of the burner. Clean them only with the procedure and tool specified for your grill, and never enlarge the holes.
Why is only one burner on my gas grill weak?
A single weak burner can result from blocked ports, debris near the air inlet, incorrect seating over the valve orifice, burner damage, or a valve problem. Shut down and inspect it according to the manual. If cleaning and correct reassembly do not solve it, arrange qualified service.
Does a higher BTU rating mean more even heat?
No. BTU per hour is a fuel-input rating, not a measure of temperature uniformity. Burner spacing, heat diffusers, grate material, firebox construction, weather, and maintenance all influence how evenly the cooking surface heats.
Can wind make one side of a gas grill colder?
Yes. Wind can carry heat across the cookbox and disturb the flame. Retest in calm conditions, but do not surround the grill with an improvised barrier that blocks ventilation or violates clearance requirements.
Should gas-grill flames be blue?
Many properly operating gas burners show mostly blue flames with small yellow tips, but normal appearance varies by design and conditions. Use the flame description in your manual. Heavy yellow flame with soot, lifting flames, delayed ignition, or fire near the burner inlet requires shutdown and inspection.
Can I put foil over a hot spot?
Do not place foil over burners, heat shields, grease channels, or ventilation openings unless the manufacturer specifically approves it. Foil can interfere with airflow and drainage. Use burner settings and food placement to manage a normal hot zone.
How often should I map my grill’s heat?
Map it when the grill is new, after burner or shield replacement, and whenever cooking behavior changes. You do not need a bread test before every meal. A quick visual flame check and routine cleaning are more useful day to day.
Can a dirty grease tray make heat uneven?
It can contribute indirectly. Grease and carbon buildup can hold heat, obstruct drainage, and feed flare-ups beneath one area. Empty and clean the grease system at the intervals in the owner’s manual.
What if cleaning does not fix the cold spot?
If the same cold area remains after correct cleaning, reassembly, fuel checks, and a controlled retest, stop replacing parts by guesswork. Contact the manufacturer or a qualified gas-appliance technician, especially if one burner is still weak or the flame pattern is abnormal.
Final Verdict: Fix the Cause, Then Use the Zones
A useful fix begins with a map, not a random parts order. Confirm that the pattern is abnormal, shut the grill down, clean and inspect the heat-distribution system, reassemble it according to the manual, and repeat the same test. Blocked ports and misplaced shields are reasonable owner-maintenance items when the manual explains them. Leaks, damaged fuel parts, split burners, delayed ignition, and persistent abnormal flames call for replacement or qualified service.
Once the grill is safe and its burners are working correctly, learn the small temperature differences that remain. A dependable hot side and cool side can make searing, indirect cooking, and flare-up control easier than a perfectly uniform surface.
About the Author
Frank W. Roberts is the author of Everything Grill Reviews. He has grilled since 1970 and brings more than 50 years of backyard cooking and cookoff experience to practical grill use and fire management. This guide is based on current manufacturer maintenance guidance, U.S. Consumer Product Safety Commission safety information, and established gas-grill troubleshooting principles; it does not claim hands-on testing of every grill design. Safety and source details were last checked September 22, 2026.